
Last week, Jenny Tanaka and I attended an Adobe Photoshop seminar in Waikiki at the DoubleTree hotel.
A few major benefits of attending seminars like this include the following: seeing what is possible in the program, becoming better equipped to do research into Photoshop's features, and watching a "Photoshop guru" put some tricks into action.
In reviewing the highlights of the seminar, this post will focus on 3 things having to do with beginner-level use of Photoshop:
 |
 |
 |
I. Shortcuts |
II. Tricks |
III. Applications |
I. Shortcuts
One of the wonderful (albeit daunting) things about Photoshop is that there are multiple ways to do just about anything that needs doing. This can be pretty intimidating for a beginner, so it is good to start learning keyboard shortcuts if you want to start learning Photoshop. The early part of the conference went over a few of the shortcuts that our lecturers would be using throughout the day. |
| A .pdf list of Photoshop shortcuts for the Mac / PC. Via NobleDesktop. |
Here are a few useful Photoshop shortcuts:
m: marque
p: paintbrush
t: text
ctrl c, v, z: copy, paste, undo (respectively)
shift brackets: increase or decrease paintbrush
spacebar: hand tool
If using a list of shortcuts isn't your thing, there are also many choices in Photoshop key covers (thanks to Krys for introducing me to these!). The two best ones I have found are pictured below.
 |
| These stickers can be applied to a keyboard for quick reference ($10.99). They stick directly on your keys. |
 |
| These removable keyboard overlays relatively pricey ($15-$40), but are removable, and also protect your keyboard. |
The following might also be of interest: a Photoshop shortcut cheat sheet, how to change shortcuts in Photoshop, and a searchable database of shortcuts for many programs on multiple platforms (Photoshop included).
II. Tricks
If I had to summarize the "Tricks" section into one word, it would be...YouTube!The seminar leader went over so many features so quickly, he recommended searching additional YouTube lessons. The following YouTube videos should bring you up to speed on what was covered at the conference.
Once the shortcuts have become familiar, the beginning Photoshopper will need to know about all of the possible tools available. This interactive YouTube video links you to quick segments that explain many of the tools available in Photoshop.
Here's a lesson on how to refresh an old photo. I especially like how this blogger annotates his videos to let the viewer know which shortcut keys he is using.
This video about getting little bits of hair into a new background is also helpful. I like this video because he provides a link to the picture so the viewers can practice on their own with his instructions.
Here is an example of one of the videos we watched in the seminar.
III. Applications
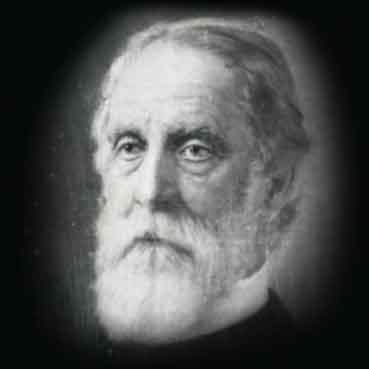
Needless to say, we definitely use Photoshop as Instructional Designers. I can think of many ways that the above-mentioned tricks can accommodate our needs here at Kamehameha Schools.For example, it is likely that we will occasionally be using historical photos. In about 15 minutes, I did a quick pass at this quick and easy technique by cleaning up a picture of Mr. Bishop:
 |
| Before |
 |
| After |
Another thing the ISC might want to do sometimes is to change the background in a photo. One of my biggest sources for images is the online Kamehameha Schools photo gallery. It is free, KS owns the copyright, and the models are our very own keikis. Using the masking technique described above, we can actually take the people in these photos and put them on a white background, as is often featured in ID projects. I am still working on mastering this technique in Photoshop, but the seminar gave me a great start. Below is an example of a background-changing project (my first ever, yay!). With more experience, I would hope to get much better at this!


I hope this post was helpful for anyone looking to learn a little more about Photoshop. If you enjoyed the above linked YouTube videos, I also recommend looking up the following topics on YouTube or Lynda: masking, content-aware fill, smart objects, and the create clipping feature.
Comments